Monday 9 September 2013

Birthday Cake

This is just the simplest sponge cake you can make, which means you can dress it up with any icing/toppings you want and it won't seem like 'too much' (as if cake could ever be too much). This cake recipe is also great at holding its shape so you can use it to 'sculpt' many different cake shapes - examples from my own childhood include a dinosaur, a house, and a hedgehog. More on this to follow in another post!

A word on the quantities used in this recipe - I used 2 eggs (and the accompanying quantities of sugar/flour/butter/milk) to make a large rectangular cake layer. To make a two layer, 7inch round cake, I would suggest using 3 eggs (and the accompanying quantities of sugar/flour/butter/milk), and splitting between two cake tins. The 3 egg quantities can be found down below.

Gather your equipment
Essential equipment:  Lined cake tin, scales, a small glass/cup/bowl, fork, mixing bowl, mixing spoon
Gather your ingredients
For this recipe you'll need: 2 eggs, 120g caster sugar, 120g butter/margarine, 120g self-raising flour, splash of milk
  • If you're using butter, leave it at room temperature to soften for a few hours
Prepare to bake
Preheat oven to 180°C, line your cake tins if you haven't already, crack your eggs into a glass/cup/bowl and beat them well using the fork. Add a splash of vanilla essence in there if you want to add some more flavour. Weigh out your flour and set aside.
Beat together sugar and butter
Weigh your sugar and margarine (or softened butter) into the mixing bowl. Beat well using the fork, until the mixture is smooth and well mixed.
Add the egg and a little flour
Add about a third of the beaten egg, along with a spoonful of the flour, and mix well using the spoon. Repeat until no egg remains but there is still some flour left (about half). Mix well. The mixture will look slightly 'split' - kind of lumpy - but don't worry, as this will go away when you add more flour in the next step.
Add the rest of the flour
Dump the rest of the flour into the mixing bowl, all at once. Stir well but try not to overmix.
Add milk
The cake mix will be quite thick at this point, so add a splash of milk and mix again until you achieve a dropping consistency - the cake mix should fall from the spoon easily. A tablespoon of milk should be enough to achieve this, but it can vary depending on the size of your eggs.
Pour into cake tin and bake
Spread your cake mix into the prepared tin, smoothing it right into the corners, and bake at 180°C. The amount of time you leave it in the oven depends on the size/shape of the cake you are making, and what kind of tin you are using.
  • Two round cakes - approx 25 minutes
  • One rectangular cake - approx 40 minutes
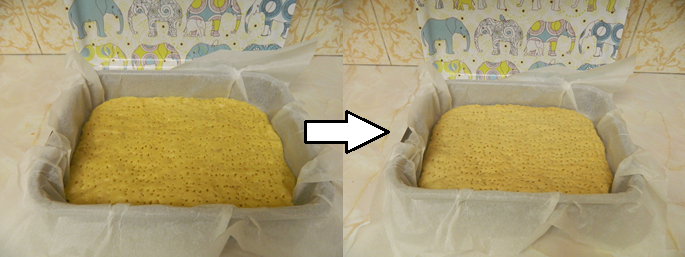
Once the recommended time is up, take it out of the oven and insert a skewer/toothpick in the centre - if it comes out clean, the cake is done. The surface of the cake should also look like the picture above - golden brown - and should spring back when touched.
Leave to cool in the tin for approximately 10 minutes before turning it out onto a wire rack to cool completely. If you are worried about turning it out all in one piece, leave it for even longer - it will be firmer and less fragile the longer you leave it.
Decorate!
You can keep this as simple as you like, or go all out. For the above cake, I baked another identical rectangular cake, and layered it on top of the first, using buttercream icing spiked with Nutella. Then I decorated with more coloured buttercream icing, making an approximation of the French flag (as this was for a friend of mine, leaving for her year abroad).

And the finished product...

And here's one example of the 'childhood cakes' I was going on about before...

Birthday Cake: - one rectangular cake; use 3 eggs instead for a layer cake! (see below)
120g softened butter/margarine
2 large eggs, beaten
120g caster sugar
120g self-raising flour
Splash of milk
  1. Preheat the oven to 180°C
  2. Beat together the sugar and butter/margarine
  3. Add the beaten eggs a little at a time, with a little flour each time, and mixing well after each addition
  4. Mix in the remaining flour all at once. Do not overmix
  5. Add enough milk to bring the mix to a 'dropping consistency'
  6. Pour into cake tin and bake for 40 minutes if making a rectangular cake, or 25 minutes if baking in two round cake tins


Quantities for a 2-layer cake:
175g softened butter/margarine
3 large eggs
175g caster sugar
175g self-raising flour
Large splash of milk

Tuesday 27 August 2013

Millionaire shortbread

Personally, this is without a doubt my most, most favourite baked good to eat. The layers of shortbread, gooey caramel and chocolate go together so well that I want to meet whoever first came up with the idea and give them a big hug. But this is quite a tricky recipe to make from scratch. The shortbread and chocolate layers are easy enough, but the caramel can often fail to set properly. There's also a lot of waiting around for layers to cool, or for caramel to boil, or for things to come out of the oven - what I'm saying is, attempt this with a lot of patience! So let's do this one layer at a time...

Makes enough to fill a 10in x 7.5in pan - about 24 squares, depending on how big you cut them.


Gather your equipment
Essential equipment:  Scales, lined tin (10in by 7.5in), mixing bowl, fork, saucepan, wooden spoon, microwave-safe bowl, mixing spoon
  • Use a saucepan with a long handle as the caramel will get very hot and you'll want to be able to hold the pan and move it around. Also use a wooden spoon with a long handle.
Gather your ingredients
For the shortbread layer: 175g butter/margarine, 80g caster sugar, 240g plain flour, 1tsp vanilla extract
For the caramel layer: 397g tin of condensed milk, 3tsp golden syrup, 55g caster sugar, 115g butter/margarine
For the chocolate layer: 170g chocolate, 1tsp butter (optional)
  • Use dark or milk chocolate for the topping, or a mix of both
Prepare to bake your shortbread base
Preheat oven to 180°C, line your tin, and weigh out your sugar, butter and flour.
Make your shortbread dough
First roughly mix the ingredients together with a fork - add the vanilla extract, then get your hands dirty and rub the mixture together with your fingers, to form a big ball of dough.
Shape your shortbread and prick with a forkPress the dough into the bottom of your lined tin. Squish it right into the corners - this is easiest done using your knuckles. Then prick all over using a fork.
Bake the shortbread
Bake at 180°C for 5 minutes, then reduce the temperature to 150°C and bake for a further 35-45 minutes until golden brown. The exact time you leave it in will depend on your oven, and on how 'doughy' you want your base to be. Set aside to cool slightly as you make the caramel (leave it cooling in the tin).
Prepare to make your caramel
Weigh out your sugar and butter, add the golden syrup, then pour the whole tin of condensed milk into the saucepan on top of everything else.
Gently heat until everything melts together
This first step is simple - keep the saucepan over a gentle heat, continuously stir everything - first to mix, and then to stop the mixture 'catching' on the bottom of the saucepan. Heat until all the butter has melted and the sugar dissolved (you can check this by tasting the caramel - if the texture is grainy, the sugar needs to dissolve some more - but be VERY careful as the mixture gets very hot).
Continue to heat gently and bring to the boil, stirring constantly until the caramel is thick and golden in colour
This step is where most mistakes happen when making caramel! Most commonly, people do not boil the caramel for long enough, so it does not set properly and ends up far too runny. This gets better with practice, but here are some hopefully helpful tips:
  • Make sure you stir continuously, and that you are catching all the edges and the bottom of the pan
  • As the mixture boils, it will bubble up the sides of the pan. If you are using a small saucepan (as I usually do) you may find it helps to occasionally take the pan off the heat, and stir until the level returns to normal
  • As the mixture continues to boil, you may see little golden brown flecks appear - continue to stir past this stage! Eventually the entire mix will turn that same golden brown; this does not mean the caramel is burning
  • The exact time you should boil your caramel for varies - for me, the entire process usually takes about 20 minutes (from the time I start heating my ingredients until the time I turn the heat off)
How to tell when your caramel is done
After making caramel a few times, you'll be able to tell exactly when it's ready. It should be a deep golden colour (I have tried my best display this in an ugly flash picture, above) and it should be thick - but slightly runnier than set caramel. There is something called the "soft ball method" but I have never succeeded in making fudge/caramel this way - it is far better to go by instinct (and besides, who wants to waste good caramel by chucking spoonfuls of it into cold water).
Pour caramel over shortbread
Take the caramel off the heat as soon as it is ready and pour over the prepared shortbread. Quickly spread into the corners as it will begin to set. Set aside to cool a little while you prepare the next layer.
Melt chocolate (and butter)
Weigh out your chocolate, and butter if using. Microwave in short 20 second bursts, stirring each time, until smooth and runny.
Pour over the shortbread and caramel
Pour the chocolate over the prepared shortbread and caramel, and once more, spread into the corners. Leave to cool for at least 3 hours - it does not have to be in the fridge, but it should be kept fairly cool.
Cut into squares
Once hardened and cooled, chop into slices and then squares of whichever size you choose, using a sharp knife.

And here they are in all their glory...
If you keep them in the fridge, the caramel will be considerably more 'chewy'.

Feel free to adjust the ratio of different layers - for example, if you prefer a thinner shortbread base, or a thicker chocolate topping.

Millionaire Shortbread: - makes 20-24 squares

Shortbread layer:
175g butter/margarine
80g caster sugar
240g plain flour
1tsp vanilla extract

Caramel layer:
397g tin of condensed milk
3tsp golden syrup
55g caster sugar
115g butter/margarine

Chocolate layer:
170g chocolate
1tsp butter (optional)
  1. Preheat oven to 180°C
  2. Place all the ingredients for the shortbread layer in a mixing bowl. Roughly mix, then rub together with your fingers to make a dough
  3. Press into a lined 10in x 7.5in tin and prick all over using a fork
  4. Bake for 5 minutes, then reduce heat to 150°C and bake for a further 35-45 minutes until golden brown all over, then set aside
  5. Place caramel ingredients in a saucepan over gentle heat
  6. Stirring constantly, allow the butter to melt and the sugar to dissolve. Bring to the boil very gently, still continuing to stir well. Boil for several minutes until you have a thick, golden caramel
  7. Pour over the prepared shortbread and set aside
  8. Melt the chocolate (and butter, if using), then pour over the caramel and set aside to cool
  9. Slice into squares once completely cooled

Recipe originally from: a series of trials and errors!

Saturday 17 August 2013

Carrot Cake

This is a Hummingbird Bakery recipe, it's perfectly moist, perfectly spiced, and we’ve had café customers claim it is the best cake they’ve ever had. You can leave out the walnuts if you like, or use equal amounts of mixed spice instead of ginger/cinnamon, if you don’t have them to hand. 

This recipe makes a two-layer, 7in cake.

Gather your equipment
Essential equipment:  Lined cake tins, scales, measuring spoons, measuring jug, grater, mixing bowl, fork, mixing spoon
Optional equipment: electric whisk, sieve, spatula

Gather your ingredients (you are going to have to use your imaginations, as this photo inexplicably disappeared from my laptop... not a single other photo, just this one)
For this recipe you'll need: 200g soft light brown sugar, 2 eggs, 200ml sunflower/vegetable oil, 200g plain flour, 1 teaspoon EACH of bicarbonate of soda, baking powder and cinnamon, 1/2 teaspoon EACH of ground ginger and salt, 1/4 teaspoon vanilla extract, 200g carrots, 70g shelled walnuts
  • Use caster sugar instead of brown sugar if you don't have any
  • Use mixed spice instead of cinnamon and ginger if you don't have any
  • Leave out the walnuts, or sub for raisins/any other dried fruit/nuts
Prepare to bake
Preheat oven to 170°C and line your cake tins. Peel and grate your carrots, chop your walnuts into small pieces, then weigh out the flour/bicarb of soda/baking powder/cinnamon/ginger/salt into the same bowl.
Mix sugar, eggs, oil and vanilla
Weigh your sugar straight into the mixing bowl. Add the eggs (no need to beat them first). Measure out 200ml of oil and pour over the sugar and eggs. Add the vanilla extract then beat with a fork until everything is well incorporated - or use an electric whisk.
Add most of the flour/spices mix
Add about a quarter of the flour/spices/raising agents mix to the sugar/eggs/oil. Use a sieve if you have one. Stir roughly, then add another quarter. Continue until there is still a little flour left.
Mix flour and walnuts
Stir the chopped walnuts into the remaining flour, until they are all evenly coated. This step helps to stop the walnuts sinking to the bottom of the cake batter.
Mix in the walnuts
Stir in the flour-y walnuts until they are all incorporated.
Add the grated carrots
Finally add the carrots and mix well. (If you taste the batter at this point, it tastes exactly how I imagine carrot-cake-flavoured-fudge would taste - if this exists in real life PLEASE let me know).
Separate into tins, bake, turn out
Evenly separate the mix into two tins, then bake at 170°C for 25 minutes. After 25 minutes, poke through the middle with a toothpick/skewer -  if it comes out clean, the cakes are ready. This is a very moist cake though, so if you'd like to leave it in the oven for another ~10 minutes, do feel free.
Allow to cool in the tins for 5-10 minutes, then turn out onto wire cooling racks. Leave to cool completely before decorating.
Decorate
I usually sandwich and ice this cake with a simple buttercream icing, spiced with cinnamon. If you are using a very 'yellow' butter/margarine, adding cinnamon also gives the plain icing a nicer colour than usual. I usually top it off with whole walnuts in a circle around the top, and a sprinkle of cinnamon. You can also buy little royal icing carrots to decorate, or there are a whole variety of sprinkles that would work - like these little gingerbread babies:

And here's the final product, with candles on as it was a birthday cake!

And here are some other variations:
The one on the left is a three layer one, destined for sale at the café. The measurements for making 3-layer quantities can be found in the recipe below! The one on the right is decorated with royal icing, and it was my birthday cake after I'd just gone dairy-free.

Carrot cake: - makes a 7in 2-layer cake
200g soft light brown sugar
2 eggs
200ml sunflower/veg oil
200g plain flour
1tsp bicarb of soda
1tsp baking powder
1tsp ground cinnamon
1/2 tsp ground singer
1/2 tsp salt
1/4 tsp vanilla extract
200g carrots, grated
70g chopped walnuts

  1. Preheat oven to 170°C
  2. Beat together the sugar, eggs, oil and vanilla extract until well incorporated
  3. Mix in a separate bowl the flour, raising agents, spices and salt
  4. In parts, add most, but not all, of the flour/spices mix to the sugar/eggs/oil mix. Stir after each addition. 
  5. Stir the chopped walnuts into the remaining flour, then add to the rest of the ingredients. Stir well.
  6. Add the grated carrots and stir well.
  7. Separate into two cake tins and bake for 25 minutes, or until an inserted skewer comes out clean. Leave to cool in the tins slightly, then turn out and decorate.

Recipe originally from: The Hummingbird Bakery Cookbook

Quantities for a 3-layer cake:

300g soft light brown sugar
3 eggs
300ml sunflower/veg oil
300g plain flour
1tsp bicarb of soda
1tsp baking powder
1tsp ground cinnamon
1/2 tsp ground ginger
1/2 tsp salt
1/4 tsp vanilla extract
300g carrots, grated
100g chopped walnuts

Sunday 11 August 2013

Chocolate fudge cake

The perfect chocolate fudge cake. You want it to be moist, fudgey, rich and chocolatey. I had been in search of this for a while, and when I finally found a good recipe, I had a chance to test it out on my brothers for their birthday. The finished result went down VERY well. The sponge doesn't even have any butter in it so it can almost be considered healthy (ha!). If you can, use a very dark cocoa powder, such as Bourneville (but Tesco does a very good imitation as well).

This recipe makes a two-layer, 7in cake.

Gather your equipment
Essential equipment:  7in cake tins, scales, mixing bowl, measuring jug, measuring spoons, fork, mixing spoon
Optional equipment: spatula, sieve
  • It is not the end of the world if you don’t sieve everything in this recipe.
  • Make sure you line your cake tins so that you can turn out your cakes easily
Gather your ingredients
For this recipe you'll need: 175g self-raising flour, 3tbsp cocoa powder, 1tsp bicarbonate of soda, 150g caster sugar, 150ml sunflower/vegetable oil, 150ml milk, 2 eggs, 2tbsp golden syrup

Prepare to bake
Preheat oven to 180°C and line your cake tins if you haven’t already. I tend to just cut out a circle of baking paper for the base, then spread a little vegetable oil around the sides.
Stir dry ingredients together
Weigh (and sift, if you have a sieve) the flour, cocoa powder, bicarbonate of soda and caster sugar straight into the mixing bowl. Stir everything together well.
Beat wet ingredients together
Measure the oil and milk in the same jug, then add the eggs and golden syrup and beat together using the fork. Make sure you scrape all the golden syrup from the bottom of the jug as it tends to stick. Also make sure the eggs have been beaten in well.
Combine wet and dry ingredients together
Make a ‘well’ in the dry ingredients, and pour in the wet. Stir well until everything is combined and smooth.
Pour into tins and bake
As soon as everything is mixed, pour the mixture into the cake tins equally. Bake for 25-30 minutes, until a skewer/toothpick inserted into the centre comes out clean. Leave to cool in the cake tins, then turn out, pick an icing, sandwich and decorate! If you're not too confident on the sandwiching step, click here for some tips.

Here, I sandwiched and topped with a chocolate fudge icing, then decorated with maltesers, oreos, rolos, reese’s peanut butter cups, chocolate covered peanuts and drizzles of chocolate:

Here, I sandwiched with a chocolate fudge icing, and topped with a dark, rich ganache:


Chocolate fudge cake: - makes a double-layer 7in cake
175g self-raising flour
3tbsp cocoa powder
1tsp bicarbonate of soda
150g caster sugar
2 eggs
150ml sunflower oil
150ml milk
2tbsp golden syrup

  1. Preheat oven to 180°C
  2. Stir together flour, cocoa powder, bicarbonate of soda and sugar
  3. Beat together oil, milk, syrup and eggs
  4. Make a well in the dry ingredients, pour the wet ingredients in
  5. Stir well until the mixture is smooth and well-combined
  6. Pour into two lined cake tins
  7. Bake for 25-30 minutes

Recipe originally from: BBC Good Food

Sunday 4 August 2013

Sandwiching cake layers together

Here are some tips for sandwiching together cake layers. It may sound easy, but it’s not great when you end up with a completely wonky, lopsided cake with the layers sliding past each other and everything falling apart. Case in point:


This cake. I made this quite a few years ago now as you may be able to tell from the quality.
The blue icing was completely the wrong consistency, as you can probably see from the picture, so the green layer kept sliding off the purple layer (which you can’t even SEE because of the blobs of icing tipping over its side). Icing consistency was one of the many problems with this cake, the others being my lack of access to three cake pans of equal size, and a lack of adequate food colourings. Something which was NOT a problem was the taste, but even still this experience put me off any further attempts at a rainbow cake. Perhaps in the future I will return to this challenge.


But anyway, here, I hope I can give you some tips to avoid common problems when sandwiching layer cakes together.


Firstly: baking
If you don’t have two (or even three, or more) equal sized cake tins, don’t worry! It is usually better to bake one taller cake and cut it in half lengthways, than to bake two different-sized cakes and try to trim one down to size. See the rough edges of the green cake above to confirm why this is a bad idea.
If you DO have two equal sized cake tins, try to fill them with equal amounts of cake batter.
Trimming/flattening
Usually, when I bake two “equal sized cakes”, they do NOT come out of the oven equal. This could be because of my dodgy oven, or because I am the worst at filling cake tins equally. If you also have this problem, choose the best out of the two to be your ‘top’ slice. Then trim the top off the other one using a breadknife, so that you have a flat surface.
Alternatively, if you want a really flat top, trim both of your cakes, and flip the top one upside down – once again giving you a flat surface!
In the picture above you can see that I have only trimmed one of the cakes (you can also see that not all of the cut-offs made it into the photo… I’m not even going to pretend that it wasn’t me who ate them). 
Secure your bottom layer in place
Always secure your cake to the cake stand! Just use a small dollop of icing as ‘glue’ – this will make things easier when you come to ice your cake; no slipping or sliding around on the cake stand.
Spread your sandwiching icing
Start by putting a great big dollop of icing in the middle of the bottom layer – use as much as you like, within reason. (If you’re using a thick icing like I have here, you can use a lot and it will still hold its shape. If you’re using a thinner, more fluid icing, you shouldn’t use too much as the top layer will be prone to slide around). 
Try to spread from the middle of the dollop, outwards, using a knife/spatula/back of a spoon. There shouldn’t be any need for the spoon to touch the outer ‘section’ of the icing – the bit that will be on show once the cake is sandwiched together – and leaving these parts of the icing untouched gives a nicer finish to the cake. Of course if you are going to cover the entire cake with icing anyway, it doesn’t matter how the edges look.
Top with the second cake
Carefully top with your second cake layer, and you’re done! It can take some practice to be able to get the top layer in the right place on the first try, but you can normally just push it into the right place if you didn't quite place it centrally the first time.

I will post at a later date about completely covering a cake in icing, as this is not easy to do neatly either. I hope this particular post was not way too obvious or patronising and that you were able to learn something from it!